VR & 360 Rendering
The History
To make the best VR content, it's important to understand the history of the medium.
Panoramic Paintings
If we focus more strictly on the scope of virtual reality as a means of creating the illusion that we are present somewhere we are not, then the earliest attempt at virtual reality is surely the 360-degree murals (or panoramic paintings) from the nineteenth century. These paintings were intended to fill the viewer’s entire field of vision, making them feel present at some historical event or scene.

Technological Developments
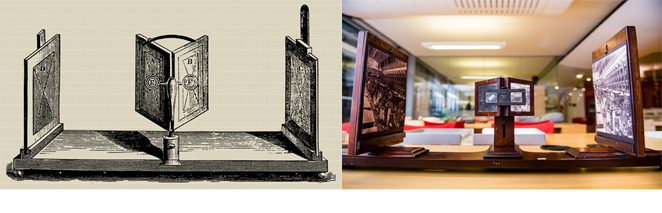
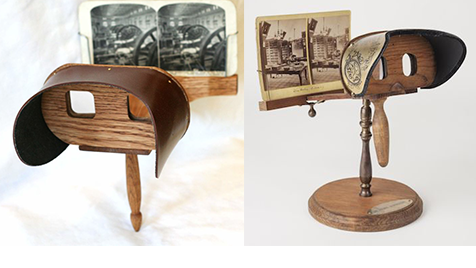
One of the first major technological developments related to VR was the stereoscope, invented by Charles Wheatstone in 1838. This device allowed us to view images in simulated “3D” by depicting left-eye and right-eye views of the same scene using two separate images. In the late 1850s and early 1860s, Oliver Wendell Holmes created a more streamlined version, which consisted of two prismatic lenses and a wooden stand to hold the stereo card. Holmes deliberately did not patent this streamlined version so that it would remain cheap to produce.
In 1929 Edward Link created the first commercial flight simulator. It was completely electromechanical and was called “Link trainer”. Flight simulator allowed safer pilots’ training. Then the US military purchased 6 such appliances. In World War II more than half a million pilots used it for flight training and improving their flying skills.
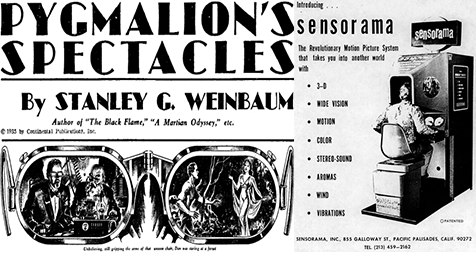
In the next century, Stanley Weinbaum wrote Pygmalion’s Spectacles, which became the first book to imagine a model for VR like we understand it today—describing a goggle-based system with holographic recordings of fictional experiences—and that was published in 1935!
The next major milestone—and especially significant in the history of 360 video—came in 1962. After years of theorizing and testing, cinematographer Morton Heilig created the Sensorama, which he called an “experience theater.” For the first time in history, audiences could step inside a self-contained immersive film and experience it as if they were in the action—in this case a bike ride through 1950s Brooklyn. The simulator was equipped with a moving chair, fans, sound and smell emitters, and a stereoscopic display that transformed film viewing into a 3D experience.
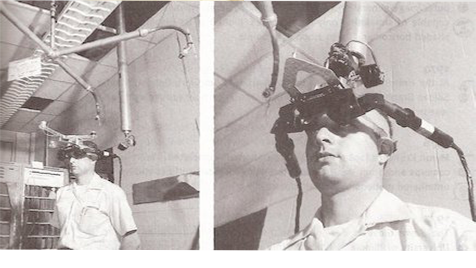
Later on in the ‘60s, computer scientist Ivan Sutherland invented the first known head-mounted display, or HMD. It became known as the Sword of Damocles because of its formidable appearance. This system incorporated computer graphics into an HMD, and offered head-tracking, so instead of simply sitting in a booth, you could actually move around and the virtual world would re-orient itself along with you.
In 1985, Jaron Lanier left Atari to work on what would become VPL Research. In 1987, Lanier coined the term “Virtual Reality,” and VPL became the first company to link visuals, hand gestures, and 3D audio with the EyePhone, AudioSphere, and DataGlove. And that’s when the VR industry first began preparing itself for consumer adoption. In 1989, Mattel turned the DataGlove into the PowerGlove for NES(Nintendo Entertainment System).
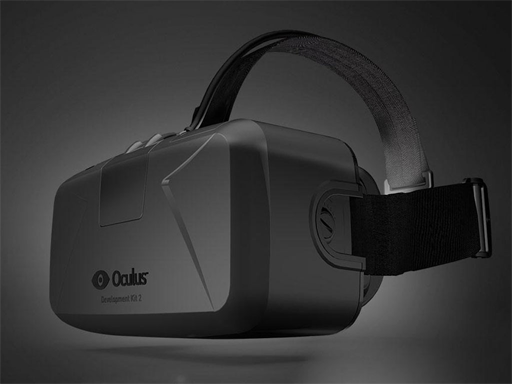
In 2012, 19-year-old Palmer Luckey launched a now-famous Kick-starter campaign for an HMD called the Oculus Rift, which was eventually acquired by Face book. Shortly thereafter, Google released the Google Cardboard, which became the most widely-distributed VR headset of all time.
A century later, that’s where we are with VR.
Why Virtual Reality is important?
What is virtual reality? You probably have a pretty good sense of what it is even if you’ve never actually experienced.
Virtual = replicated (often digitally); artificial
Reality = What we consider ‘real’ as pieced together from sensory inputs (e.g., sight, touch, etc.)
But why? What’s the point? Why is it important?
Virtual reality is a kind of digital reality–a way of using technology to create environments designed for expressly human interaction. This is, of course, different than our physical environment.
We are human beings, and human beings are simply one organism functioning interdependently with literally countless other living things. The world isn’t designed expressly for us, which is a matter of theological and metaphysical contemplation really.
By suspending disbelief the same way we do when we read a novel or watch a movie, an artificial reality can be designed to enable experiential learning, scenario-based learning, social learning, workplace training, and more. Virtual reality can be used for pure entertainment–digital toys, video games, or as you can see in the video above, to swim with whales. How it turns out, who knows? This is all (possibly overly-enthusiastic) rambling right now.
Today, we think of realities like this as ‘digital,’ but meaning is made in our own minds, and you and I are from a time when digital is seen as artificial. That’s our meaning which has been constructed over time. What happens when the balance begins to shift–when digital and physical are seen as equally ‘real’? Meaning, in our minds, is as flexible as the reality in a digital space. They are fluid.
Today’s classroom is not much different than one Dewey might have seen. It’s a dated mode with bells and whistles shoe-horned in. Virtual reality in today’s classroom would be like using Google self-driving cars in a NASCAR race. But not far in the future, the potential for virtual reality in education–at least as we conceive it today–might far surpass anything you’ve seen in educational technology so far.
Virtual reality will allow us to create any environment for simulated interactions. Anything. Any machine. Any classroom with any activities for any purpose. It will be the ultimate unclassroom. In fact, the word classroom will stuffed full of the connotation of limitation.
Gaming may be king of the virtual reality world, but the technology is being adopted by a host of other industries — from retail to travel There are a number of other industries that are hoping to take advantage of the technology
Maybe virtual reality will be a radical new form of expression. Maybe it will just be for short, immersive, therapeutic experiences. Or maybe it's just another entertainment medium to accompany theatre, painting, print, music and film.
The only stumbling blocks are time, costs and technological limitations.
But if these problems are solved then there is an exciting future for virtual reality.
Where is Virtual Reality used?
- Virtual Reality in Healthcare
- Virtual Reality in Fashion
- Virtual Reality in Business
- Virtual Reality in Sport
- Virtual Reality and Scientific Visualization
- Virtual Reality in Construction
- Virtual Reality Programming languages
- Virtual Reality in Education
- Virtual Reality in Entertainment
- Virtual Reality and Heritage
- Virtual Reality in Engineering
- Virtual Reality in Media
- Virtual Reality in Telecommunications
- Virtual Reality in Film
- Virtual Reality in the Military
Irrespective of the use, virtual reality produces a set of data which is then used to develop new models, training methods, communication and interaction. In many ways the possibilities are endless.
Demystifying 360 Video vs. VR
Till now i have been using term VR (Virtual Reality).
Now it's time we should know differences between the terms 360 degree video and VR (Virtual Reality),the differences are finite but it's important to know them.
While the media and marketing materials often use these terms interchangeably, 360 and VR are actually two separate experiences.
To be fair, 360 and VR are viewed from the same headset technology.
I wanted to clear up any confusion, as the differences between shouldn’t be overlooked when we are making our first steps into this new era of video creation.
In simple words, Imagine someone has cursed you to become a Tripod stand and placed you in a beautiful restaurant...You can turn 360 degree and look everywhere but cannot move from your spot. You are able to see things and also understand their relation with each other. But they are still in 2D and dead like photos... You can see the most beautiful girl but cannot go near, see the best food but can't reach out.
That's 360 degree video for you!
Now imagine you are time travelling ...You are suddenly removed from the spot you are and placed at a new place where you can see things all around and forget the original place you are. Now you can not only see things around but also move towards them or they can come to you.
That's virtual reality for you!
MOVEMENT is what makes the difference!
Other than Movement, Interactivity also makes a lot difference. 360 videos and photos are more limited in the way that the user is able to interact and connect with his environment. In virtual reality, the user forms a connection with their environment that is more intuitive, and emotionally stronger.
A 360 video can be viewed in many ways. You might watch one on your phone as you scroll through your Facebook feed, using your finger to move around to get the 360 degree perspective.
But to see VR you need a Headset or HMD
When watching a 360 video, the viewer can move either left to right or top to bottom within an enclosed spherical space. On the other hand, a virtual reality experience can almost see limitless. You have control of your environment beyond direction. Instead of looking around, a viewer can move around (well, virtually) and interact with the environment — within the limits of the software. Objects can be picked up, doors can be opened, and on it goes. These creations can get fancy (and expensive) and involve more than just a headset: joysticks, gloves, suits ... just to name a few accessories.
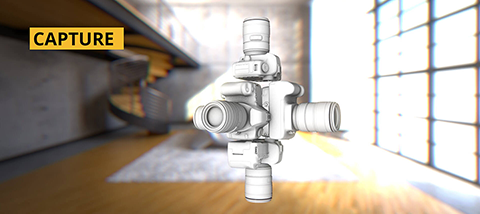
Capturing 360 Videos and Images
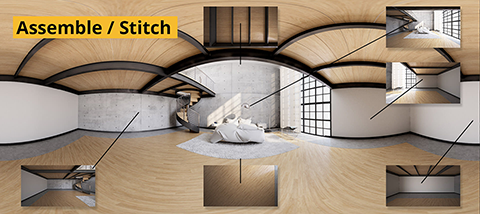
360 videos are created by filming all 360 degrees of a scene at the same time. Users can view the video from any angle. Turn and move the device and the 360-degree video will follow, creating an immersive “virtual reality” type experience. 360-degree video is typically recorded using either with a special rig of cameras or using a dedicated camera that contains multiple camera lenses embedded into the device. The resulting footage is then stitched to form a single video. This process is done either by the camera itself or using specialized video editing software that can analyze common visuals and audio to synchronize and link the different camera feeds together.
It is often called 360 panoramic photography, VR (virtual reality photography), 360 virtual tours, 360 spherical photography, and more recently photosphere ( a term made popular by Google because of the android app they created)
We have a couple of special camera rigs in the market that can hold 6 or 10 (e.g. Go Pro Hero4) cameras in a spherical shape. Each camera is mounted at a specific angle so the camera’s field of view will overlap portions of the surrounding cameras’ field of view. That overlap will eliminate any gaps in the footage and allow for flexibility at the seams. When all the Go Pros are recording, they capture video at the same time, and it covers the entire 360° by 180° area.
BRIEF WORKFLOW
Using normal camera gear, tripods and software, we will capture a scene either in parts or all at once.
The footage will be joined together to generate a special piece of footage that stores the entire spherical image.
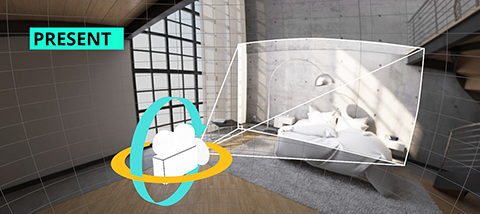
That view will be loaded into a special kind of video player that change the spherical image back into a normal view, like any other movie. That view can be moved around, using a mouse, keyboard or even the gyroscope in a phone allowing people to look wherever they want to within the world we created.
Another way of letting people explore your video is using a head mounted display like the Oculus rift, or using a special container made for Smartphone ,Google’s cardboard for example.
Some Important Points to keep in mind while creating 360 video and images
• FIELD OF VIEW
Shooting video in 360° is not like shooting regular video. It has its own set of rules and considerations.
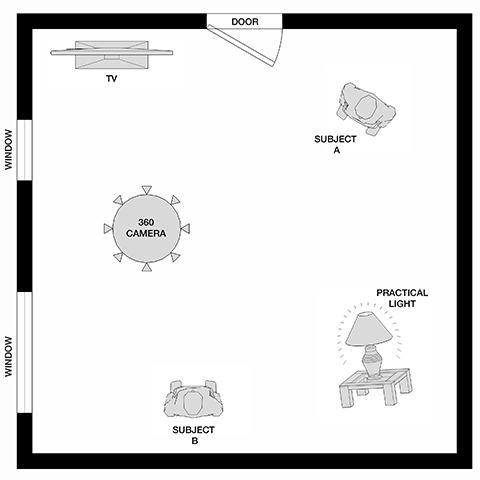
Now, the first thing to remember is that 360° means EVERY THING is in the view of the camera and will be in the shot. This includes you, your crew, any lights, microphones, equipment, every crack on the ceiling, and dirty footprints on the floor. This type of shot limits and gives freedom to the director at the same time. You may have to be in the shot, so be creative, don’t make it obvious—blend into the scene—or hide behind/under/in objects on location. When scouting locations, take the entire space into consideration. Envision the action that will take place, how should that action interact with the camera? And make sure the available lighting is suitable or get creative with camera placement.
• CAMERA LOCATION
Placement of the camera in the scene is key and important to storytelling. To capture the action of the scene, you need to consider what role the person wearing the VR headset will take. Are they participants or observers? Meaning, should the camera be placed at an odd position, like hung from the ceiling or low to the ground? Or mounted six feet from the floor to equal to an average person’s height? In either case, the camera should be placed in or around the center of the activity. That way the viewer can explore the scene as they wish, and will have something of interest in all directions.
• CAMERA MOVEMENT
The last item to consider is camera movement. In order to achieve action, there needs to be an impetus of movement, like a drone, a car, a track, or a person. Bear in mind, whatever is controlling the motion will be in the video. For example, if you hang the camera from a drone or helicopter those vehicles will be visible in the final result. There are ways to remove or hide smaller objects in post-production, but that is a lengthy process. Because the video will become an immersive experience, motion of any kind needs to be calculated and intentional, otherwise it can cause nausea or it can disconnect the viewer from the experience.
• AGENCY
Though you cannot directly interact with the story in a 360 video, you can still choose where to look, which allows you to “create” your own experience of the story. This freedom of choice is called agency. Ultimately it’s your audience's choice where they’ll look and how they’ll spend their time. Agency is one of the major differences between 360 and 2D video.
• PRESENCE
Agency helps generate presence. Presence is that sensation of actually being there when you’re in a 360 experience. If audiences recall a given VR experience by relating it to a moment they lived, rather than something they watched, you as the creator have provided them with a sense of presence.
• KNOWN ISSUES
There are few issues that comes at the post capturing stage like stitching problems and bad resolution after rendering raw footage in 360 format and also quality loss at the time of sharing it on YouTube , Facebook or any other compatible platform.
Links for References
DETAILED INFO ABOUT CAMERAS AND LENSES TO USE FOR 360 VIDEOS AND IMAGES
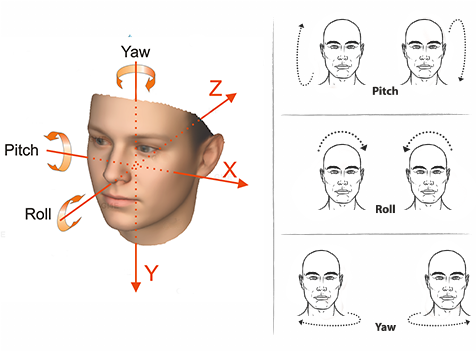
3 DoF & 6 DoF
In 360 video, you’re only granted three degrees of freedom, or 3DoF. Those three degrees are Yaw, Pitch, and Roll, which are types of rotational change around the x, y, and z-axes.
VR is created digitally, and allow for interactivity using controllers, or in some cases even your hands.
Where 360 videos have 3DoF, VR experiences have what’s called “6 Degrees of Freedom” or 6DoF.
6DoF means that, in addition to the three types of rotational freedom you have in 3DoF, you also have three types of positional change: forward/backward, up/down, and left/right.
Monoscopic and Stereoscopic
Now we know differences between 360 and VR. It's time to move to next level, understanding the difference between Monoscopic and stereoscopic and their use.
Stereo images provide a different image to each eye, whereas mono images show the same image to both eyes.
A standard 360 video is a flat equirectangular spherical video similar to viewing the world map on a globe. Monoscopic video is captured using a single lens system. The end result of a Monoscopic 360 video viewed through a VR headset is that everything appears the exact same distance away. A person standing 1m away will have the same depth to them as a person standing 5m away. Due to scale differences between the two people, the human brain will interpret some distance between them, but your eyes themselves are not providing the information of this distance, it is a product of your brain knowing relative sizes and proportions. Overall the result is satisfactory, many people are thoroughly impressed with Monoscopic video.

Stereoscopic videos are a world apart from these. The addition of depth information within these videos is the main difference. Using two lenses side by side gives each eye a different vantage point and you naturally experience the depth (as in 3D movies).
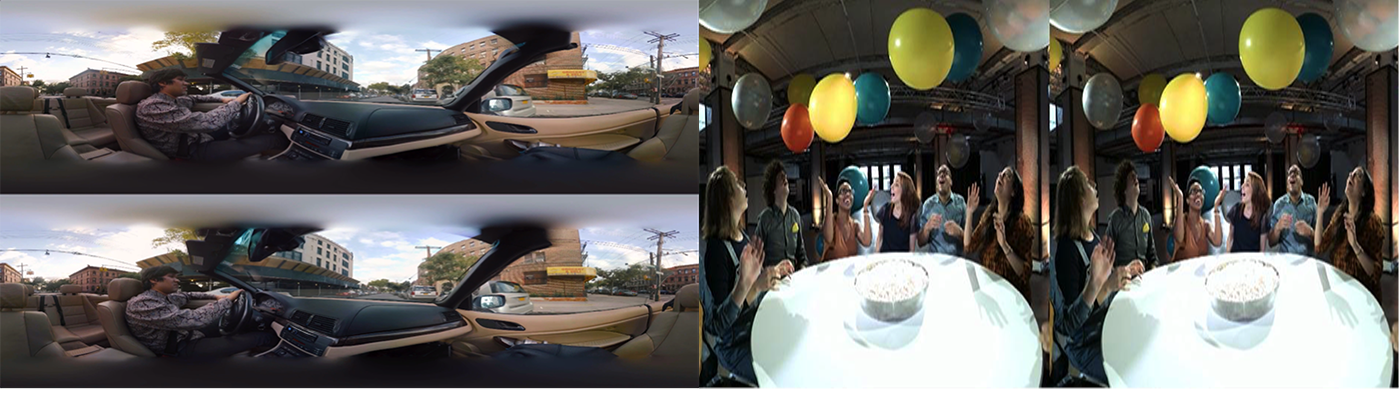
Stereo content provides a vastly better experience for the viewer because things look 3D like you could almost reach out and touch them. Your brain gets similar information to what it would expect so it is also more comfortable to view if correctly created.
Stereoscopic video is captured using a twin lens system. The end result of a stereoscopic 360 video viewed through a VR headset is that some objects appear closer than others, simulating our own binocular vision. A person standing 1m away will appear 1m away when viewed through a VR headset, whilst a person standing 5m away will not appear as close to you, they will appear 5m away. The stereoscopic effect is most apparent with occluded objects, when one object slightly overlaps another. This is the way we see in the real world, using both our eyes to perceive depth and distance. Overall the result is excellent, with nearly all people in absolute awe of the experience.
VR headsets were designed for stereoscopic imagery, this is the basis of virtual reality and that's why the goggles have two lenses.
360 & VR Video Production
Planning for Videos
Native thinking is the art of composing content with the unique capabilities of the medium in mind, rather than trying to force-fit legacy formats. VR isn’t just “new movies” or “new video games.” Presence is the heart of what makes an immersive experience special and unique. Presence is the feeling of being in the space of a given experience, of being there. That sensation leads to the need to be active and play a role in the story. When thinking about VR audiences: there is no such thing as a “neutral observer.” Your audience will feel an increased sense of responsibility in a VR experience. It’s your job as an immersive storyteller to take advantages of this unique aspect of VR. Give the viewers things to learn. What can they discover by looking around the space?. In VR, the space is the story. Spaces are loaded with sensory detail, ideas, behaviours, and narrative potential—your job is to put that all to use. Think about how you can build environments capable of making the viewer imagine stories of their own, even without any other human beings in the picture. Location scouting is a crucial consideration. Taking practice shots with your 360 camera before you ever get into production will help you immensely in planning your experience because you’ll truly consider the space. Background details should also be modelled properly, so it’s very important to consider the placement of objects, characters, and plot details in your writing and planning.
A Point of Interest, or POI is an element within an experience that attracts a viewer’s attention.
There can be more than one POI per scene, but it's not a good idea to have too many conflicting POIs in one scene.
Camera movements are also helpful if used sparingly and slowly
Story boarding
The storyboard should be a representation of how the video will unfold.. Story boarding may not be suitable for preview of your video because drawing a 360 image is not an easy task. So creating a overhead diagrams is a better idea.
Concept Art
Creating concept art according to the point of interest can be useful to get Light and colour sense and also overall look and feel of the video.
Examples of 360 Concept Art
Understanding Scale
Since VR allows the viewer to experience what it is like to be inside an environment, scale is a critical part of making that experience feel correct. This is true for environmental scale and viewer scale. To that extent, there are two dimensions that are critical to making this work. The first is the location of the camera (placed at the correct height), and the second is the inter ocular distance or IOD.
Interestingly, the IOD is one of the most important factors in determining a scene’s scale in relation to the viewer. In part, because it determines the distance between the two cameras used to render stereo. You naturally use that distance to determine how big your head and body are in the scene. If that distance is too small, (also known as hypo stereo), your body is essentially scaled down in the scene and the world appears too large. If the IOR is too big (hyper stereo), then your body is enlarged and the world around you looks miniaturized. So what is the proper scale to use? IOD will vary with both age, gender and ethnicity. A default eye distance needs to be based on statistics. The most cited reference is the US Army study (ANSUR) from 1988. The median or mean IOD value in this study is 63 mm (the min and max are respectively 52 and 78 mm). Furthermore, other studies such as the Dictionary of Optometry cites 64 mm for males and 62 mm for females, indicating that 63 mm is the average. Then there is the study by Moffit giving a mean or median value of 63 mm and Waack of 63.5 mm.
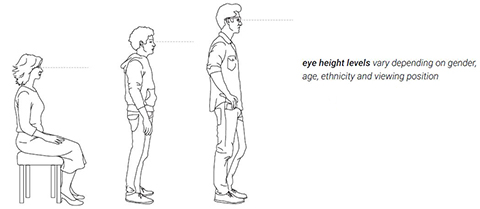
The next dimension is height. For most cases, you may want to viewer to be either standing or sitting. Either way, you will have to set the camera at the proper height.
There is a significant variance between the female and male anthropometric data for both eye height from the ground in a standing and seated position. Additionally, a seated position could vary greatly depending on the type of chair used, from a low sofa-type setting to a workstation chair adjusted to a high position. The statistical sizes of people also vary with age and ethnicity. For instance, the average height for an elderly person can be up to 80 mm lower than that of a younger person. Height also varies significantly depending on nationality. Dutch people are generally among the tallest, and Americans are generally larger than the British, who are larger than people from India or Spain and so on and so forth. Lastly, the relevant target group for the VR experience may be significantly different to the general population. For instance, if you are creating content for use in high school, or for a pro basketball experience.
The company Ergotron references US anthropometric studies that suggest a seated eye height average of 117 cm, with a female sitting eye height of 112 cm and a male sitting eye height of 123 cm. For a standing experience the figures are an average of 157 cm, with a female standing eye height of 151 cm and a male standing eye height of 164 cm.
At the same time, these are not a hard and fast rules. You may have scenes where you would want to allow the user to experience at different scales.
Understanding Stereography for VR & 360 Video or a image
Stereography is the act of delivering two unique images from two different cameras. These cameras are slightly offset from each other to mimic what each eye (left and right) would see, essentially giving the viewer an experience that appears to be 3D. We will cover how to actually do this in a later section of this paper. This section explains how stereo images for a 360 degree VR view are different from stereo images for a flat screen.
When rendering stereo for a flat screen, such as a 3D movie, setting up a stereo camera simply involves rendering from two properly offset cameras: left and right. Generally the offset is set at 6.3 cm apart, and this figure is referred to as interocular distance, or IOD. It is sometimes called interpupilar distance. However, this offset value is often cheated in feature films, even on a shot-by-shot basis. The reason for this is that a close-up created with a long lens may give a false sense of scale (making a person’s head seem giant) if a standard 6.3 cm offset is used. Stereographers will reduce the interocular distance to a value as low as 2 cm or less for such close-ups.
For a VR experience, there is no such thing as a “close-up.” The viewer experiences what is happening as if through their own eyes. For that reason, the interocular distance needs to stay at the correct physical scale for the scene. It should only be cheated if you want the user to feel as if their own scale has changed within the scene.
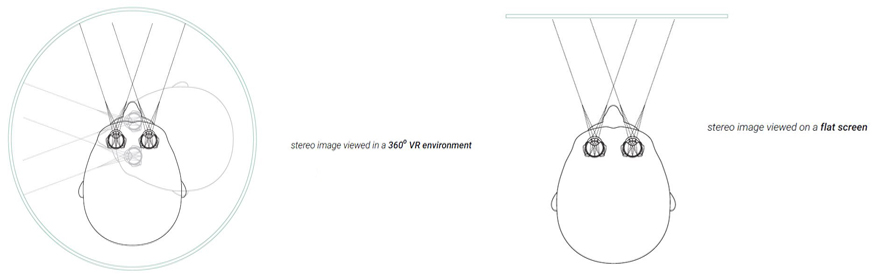
The next point to discuss about watching stereo on a flat surface, such as a theatre screen, is that the viewer is looking forward the entire time. In essence, the viewer is looking through a window, with little rotation to their head as they watch. In this case, creating a stereo image with the offset cameras pointing straight ahead at the action works well.
In contrast, with a VR experience the stereo effect needs to work no matter which way the viewer is looking. By using the standard offset cameras, when looking forward, your left and right eyes are correct. However, if you look backward, and the offset is the same, your left and right eyes are swapped. Therefore, a special type of stereo camera needs to be adapted for 360 degree images. Not only do the cameras need to be offset from each other, but they have to maintain that same offset as the camera rotates to view the whole 360 degree image.
Mono-spherical images are relatively simple to produce in a digital environment, as they are shot under the same principle as in the physical world — with a single camera rotating around fixed pivot point.
Mono-spherical images are shot with a camera with its own pivot point, their view is that of a single eye looking in all directions. If we were to apply this to the cameras on a stereo rig, it would be the equivalent of our eyes spinning around in their sockets, which is clearly not how they behave. The result would be an image where we see a stereo-3d effect in the direction the cameras were initially facing, and a cross-eyed effect in the opposite direction due to the cameras viewpoints being swapped when they’re turned 180 degrees.
To get around this headache inducing effect, we need to create a camera rig that behaves the same way our eyes do in relationship to our heads. This means our two cameras need to rotate around a single shared pivot point with our preferred eye separation as the distance between the cameras.
Camera/Stereo Configurations
Now that we’ve covered the basics of how stereo camera rigs are created and how they move, let's take a look at stereo configurations that we could apply to the cameras themselves. The three primary configurations are Converged, Parallel, and Off-Axis .
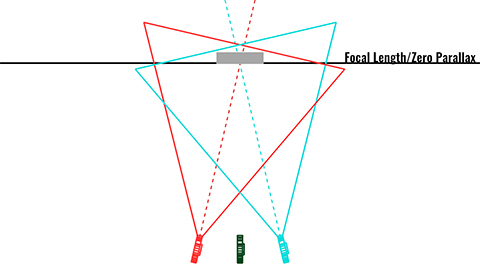
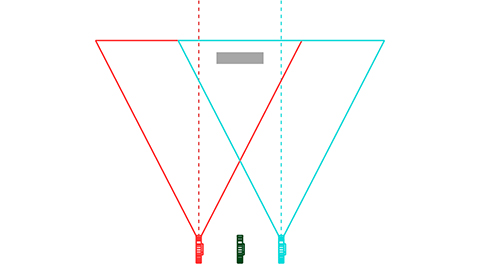
Converged
A converged stereo rig consists of two cameras toed-in to focus on a single plane of space known as the Focal Length or Zero Parallax Plane. This type of stereo configuration might seem intuitively correct, as it behaves the way our eyes do. However, when the two angled views from a converged stereo rig is displayed on a flat surface, you’ll notice what’s called Vertical Parallax, or keystone effect, on the projections of each eye. This is caused by trying to display the offset perspective of each camera onto a single screen that is not perpendicular to either of the cameras.
This method can cause eye-strain due to the distortion and objects not converging seamlessly.
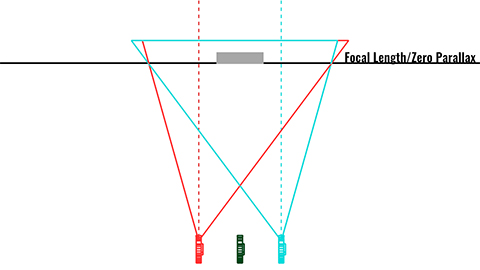
Parallel
As you may have guessed from the name, Parallel stereo rigs are comprised of two cameras parallel to each other. This configuration may get rid of our distortion/keystone issue, but it immediately introduces the problem of our Zero Parallax being stuck at infinity. This means everything in our scene will appear to pop out of the screen. We can fix this in post by artificially adding a convergence point using a technique called Horizontal Image Translation, but this involves cropping down our images and is a time consuming process.
We’re better off avoiding this altogether and using a different configuration.
Off-Axis
Off-Axis are generally the most commonly used stereo camera rigs, as they provide the best of both worlds from Converged and Parallel set-ups. They consist of two parallel cameras to eliminate any head-ache inducing Vertical Parallax (key stoning), and the cameras have asymmetrical frustums which allows us to control our Zero Parallax plane. One drawback of this method is that due to the cameras being parallel, objects at infinity will have the same disparity as the rig’s camera interpupillary distance. This means that objects in the far very distance wont fuse when looked at.Despite this, Off-Axis stereo rigs typically provide the best overall stereo viewing experience.
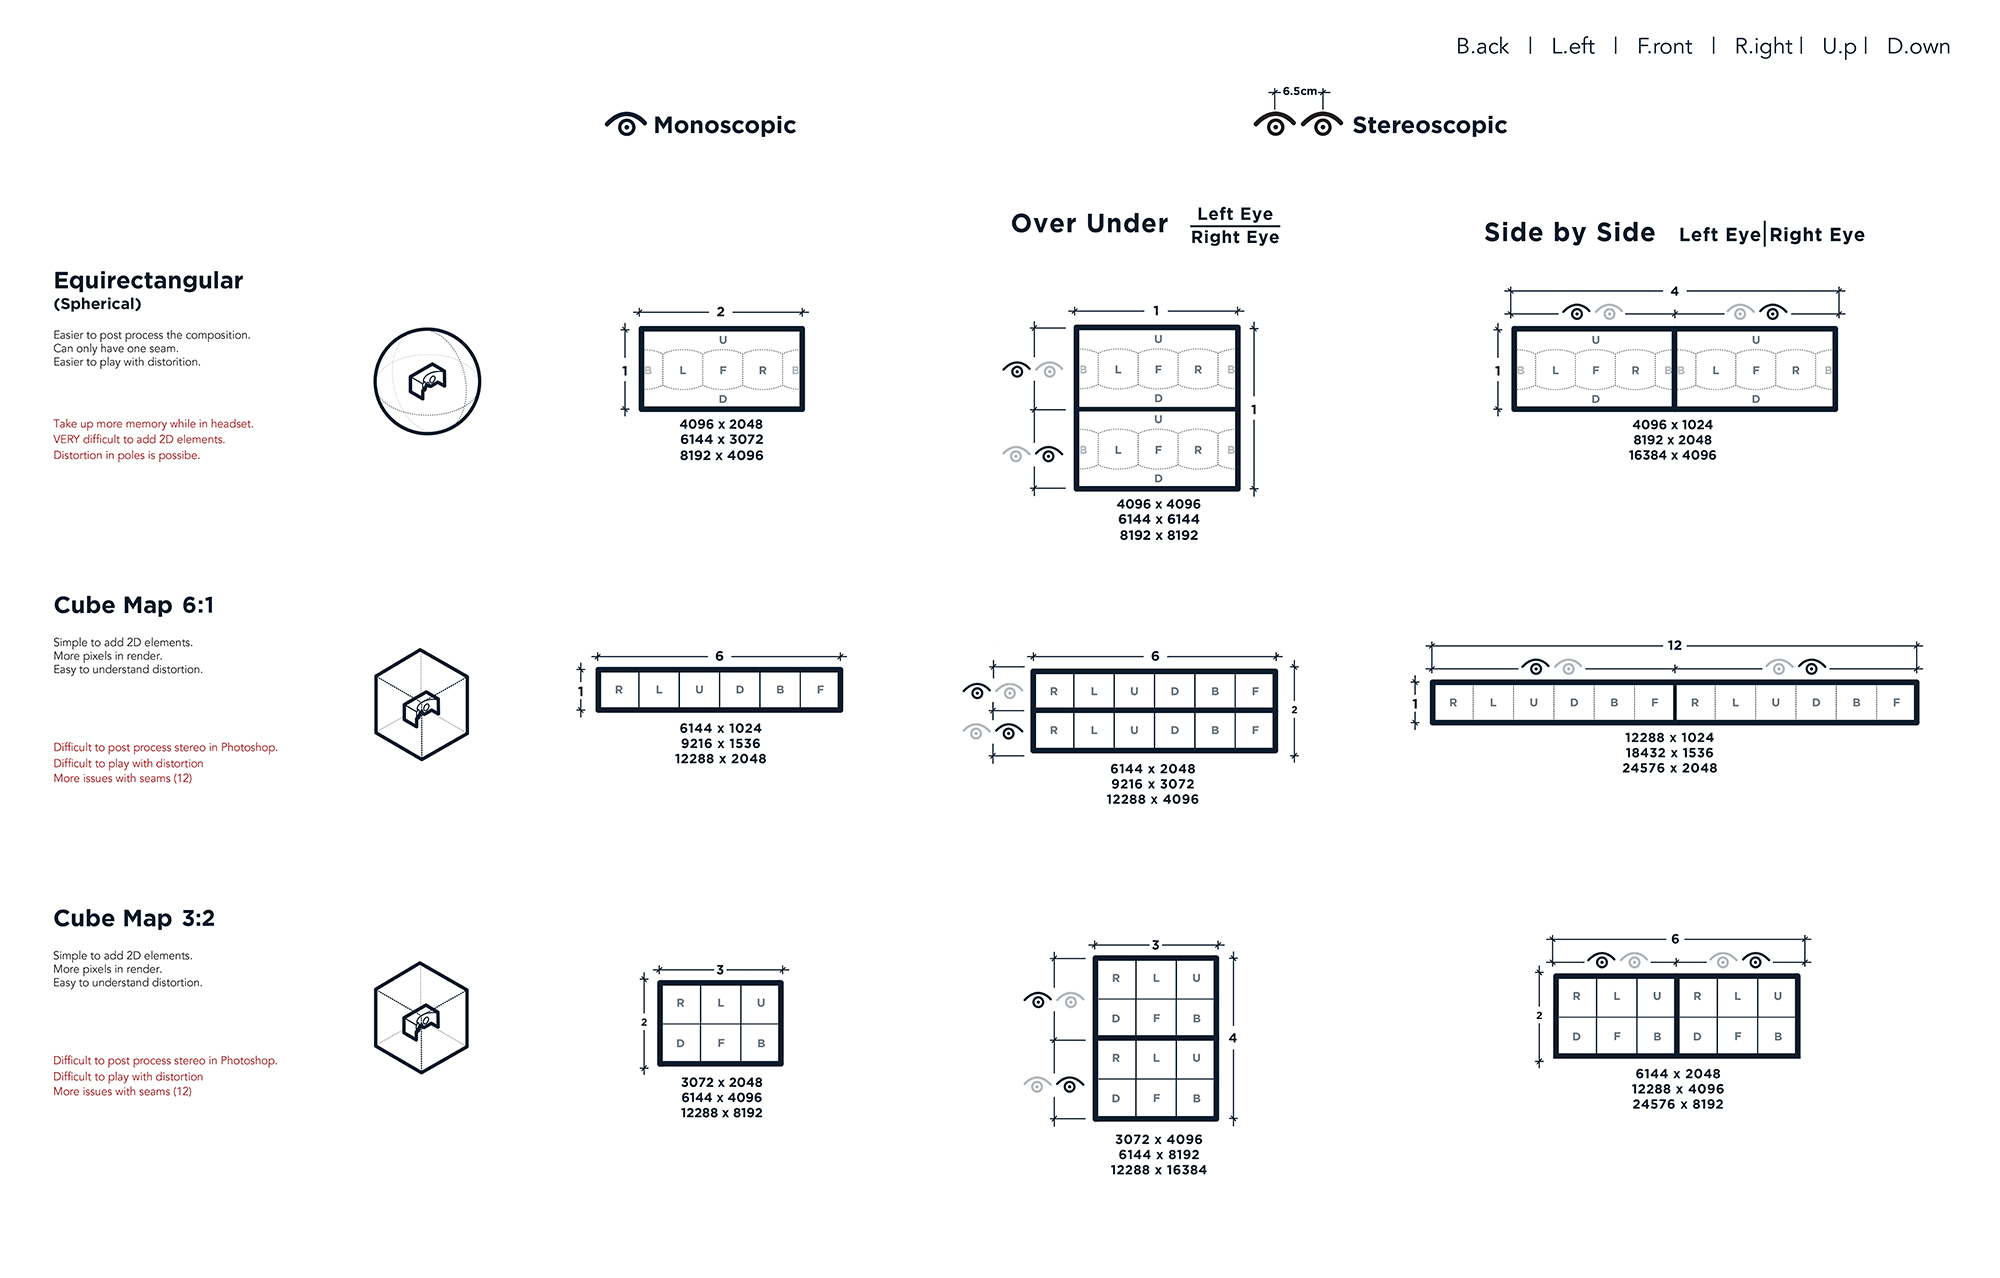
Types of Projections used for Rendering 360 Video
There are several projection methods that can be used for rendering 360 video. The Projection also depends on the platform we are going to use our video for.
1.Spherical Projection ( Latlong or Equirectangular)
2.Cube Mapping
Spherical Projection
Spherical Projections is most common way for rendering 360 and VR videos and is widely accepted by all the platforms. Spherical projections are also known as Latlong Projections, Latlong here means Latitude and Longitude which is basically term used to define points on a sphere.
Understanding Latitude and Longitude (Latlong)
Understanding how it is visualize in 2D is incredibly helpful for creators. Since we will be working and editing on a flat screen. So in simple way there is two common methods to Unwrap a sphere one of them is spherical projection (Latlong).
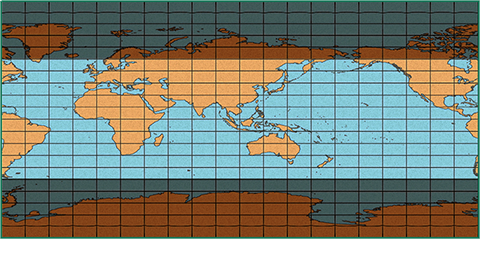
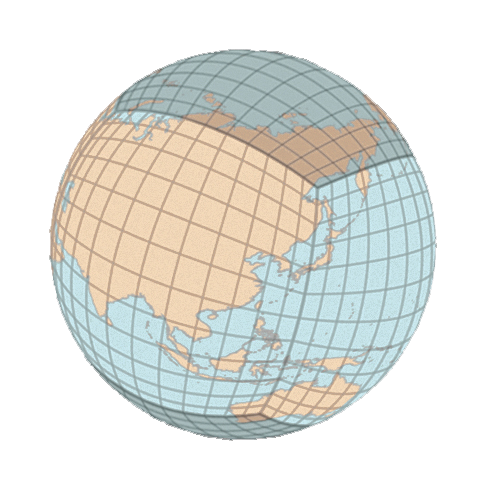
Imagine taking a globe and stretching it out flat into a map.

This is basic fundamental of Spherical or Lat long or Equirectangular Projections
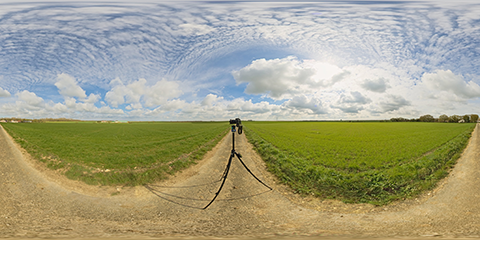
The nice thing about Latlong is that they are able to represent the entire world in single image, only with one seam running down an edge of longitude line, and another two on top and bottom latitude lines, where the image turns into a single point. This format makes it much easier to see the environment as a single image, and this in turn makes it easier to edit.
Zenith & Nadir
The Top and Bottom section of the 360 Video is known as Zenith and Nadir.
So if you are recording a 360 video on monopod or tripod then rig will be seen at Nadir and sky or roof will be at Zenith

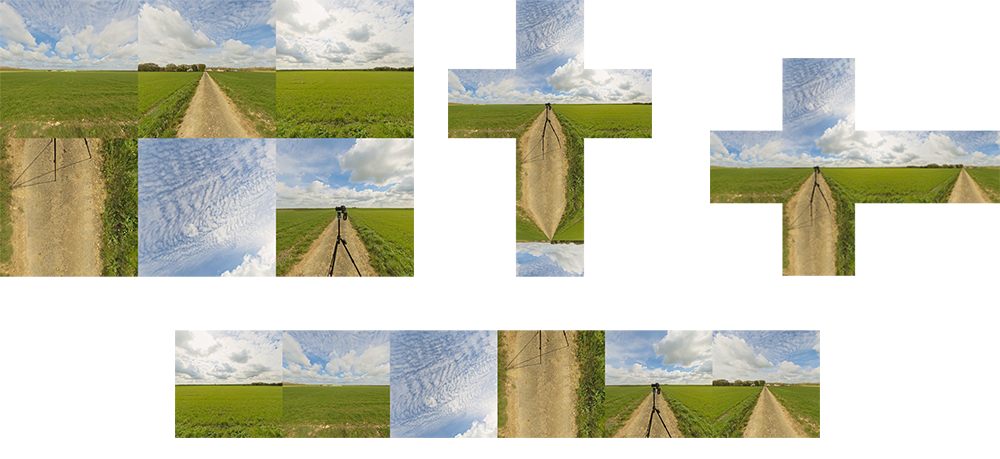
Cube Mapping
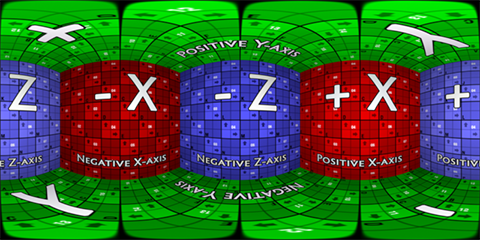
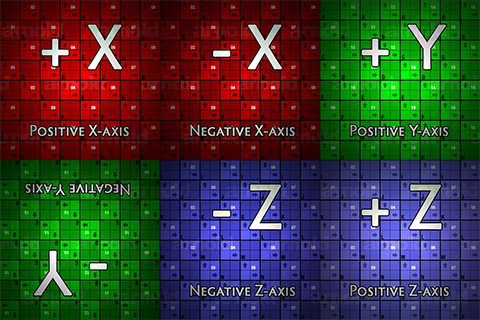
Cube Mapping is another way of visualising 360 Video. Cubemap is a collection of 6 squares that represent a 360 environment. Cubemaps are much more efficient at representing 360 degree images. As their name suggests, Cubemaps place the images on the inner surfaces of a virtual cube. The six square images are then placed side by side. There is little distortion with Cubemaps since each of the six side-by-side images appear as a 90 degree FOV image, with one square facing in each direction. There are 4 known layouts for Cube Mapping.
Pros and Cons
Benefits of Spherical Projection
As spherical projection is most common and older method to produce 360 contents they are widely accepted by all the platforms which can stream 360 video. And also is available with all softwares which can be used for rendering a 360 video or image
Benefits of Cube Mapping
Cube Mapping projects six images of equal proportions on each side of cube and because of that the overall image is less distorted.
Compared to the Latlong, only two of the six images are used for the top and bottom poles, which accounts for only 33% of the entire Cubemap image.
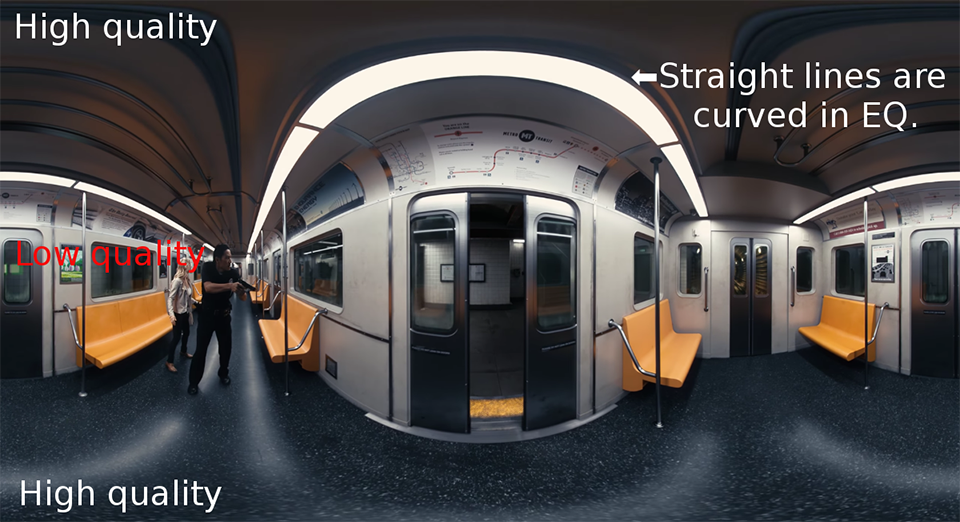
Drawbacks of Spherical Projection
The issue with Latlong images is that they are very distorted, 66% of the image represents the top and bottom poles, which are quite distorted and generally not the area of focus.

Pinch can be seen at the top and bottom section of 360 Video or Image
Drawbacks of Cube Mapping
Cube mapping is a newer projection technique as compared to spherical projections and is not accepted by all the 360 streaming platforms. Each rendering software gives a different layout for rendering cube mapping which may be supported by one streaming platform but not by the other one. So we can only use Cube mapping if we know the platform and layout on which our video or image is going to be used.
Chances of getting a seam line is much more in cube mapping because each edge of the cube represents a seam, there are far more seams compared to the Latlong Generally, you won’t see edges in the images if the VR player is good, and the images are high quality. But if you have compression artifacts such as with the popular video codec H264, those edges will tend to show up as seams in the VR playback.
Seams can also be avoided by rendering images or videos in box filter (1x1). This is fine because a softer additional filter will be applied when the cube map is warped for display.
Placing the Camera
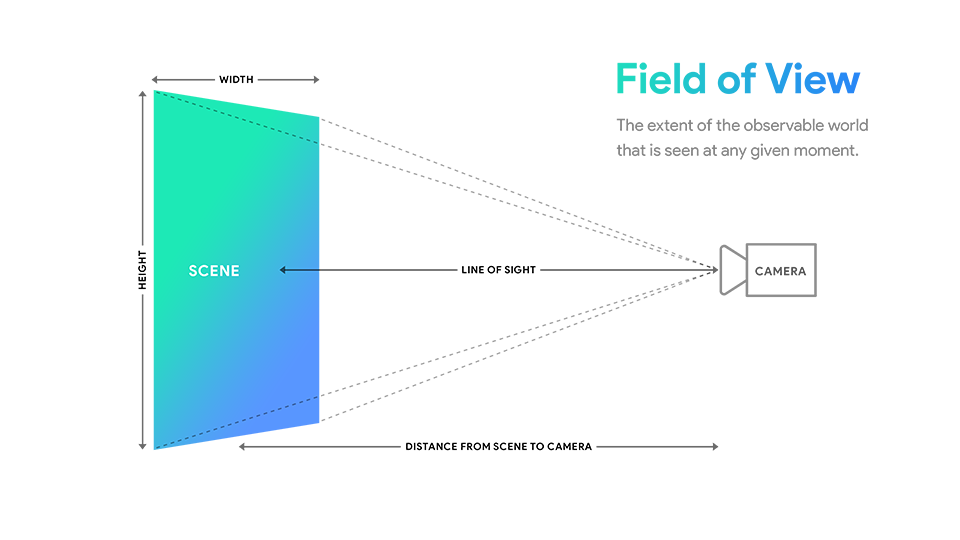
Besides placing the camera in the correct location relative to the scale, there are other aspects to consider. First is that you are not trying to match a specific camera or lens - you are trying to match what a specific eye sees. Therefore, you want to use a basic camera that simply has a direction of where it is looking.
The next thing to consider is the field of view (FOV). This refers to the amount of the image you see at any one time. Since you will be rendering a full 360 degree image, the FOV attribute will be ignored. But if you want to have a general idea of what someone will see when they put the headset on and look without turning their head, use a 90 degree FOV, which for a 35 mm film back represents the look of an 18 mm lens. Again, the camera will render the full 360 degree, this is just to assist you as you place your camera in the scene.
Some VR experiences initialize the viewer in a specific direction every time they place the VR headset on. This may be something to consider. They generally initialize what they consider to be the “front” position, which is important if your scene is set in a vehicle, for instance. If this position is important to your VR experience, place the camera to point in that position to set what is considered front. Also consider whether you want your user to have a seated or standing experience, and then position the camera accordingly.
Rendering VR & 360 video in Maya Arnold (2.1.0.1)
So now we know basics and fundamental of 360 images so its good time to step into rendering world. Rendering 360 images and videos in CG is much more easier than capturing them in real world but it has its own limitations and challenges that one has to overcome .
Arnold provides 6 different types of camera. Each camera has its own advantages and disadvantages.

1.Cylindrical
2. Orthographic
3.Spherical
4.Fish Eye
5.VR_Camera
6.Perspective
From above mentioned cameras, cylindrical ,spherical and VR camera can be used to render a 360 image or video.
Fish eye and perspective can also be used to render 360 images but the workaround is lot more difficult than others.
Cylindrical Camera
This camera provides a cylindrical view, useful for creating panoramic views. A common use of this camera projection is to allow the creation of environment maps (in 'lat-long' or latitude-longitude format)
Attribute reference for Cylindrical Camera
The benefit of using cylindrical camera is, we get control on both horizontal FOV and vertical FOV.
This can be used if we have specific requirement to change the FOV.
To render a proper Latlong or spherical image or video we can use Horizontal FOV of 360 and Vertical FOV 180.
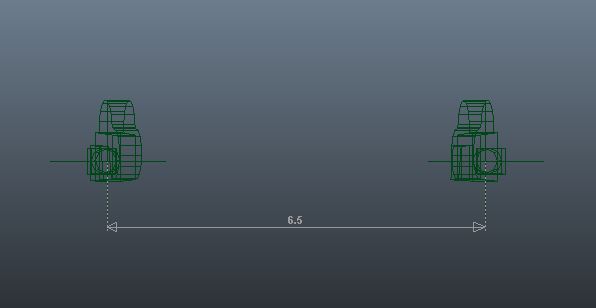
But to render a stereoscopic Latlong image we need to add some extra efforts in creating a manual camera rig i.e. Creating two camera one for left eye and one for right eye and placing them at the distance of 6.3 or 6.5 cm (This distance changes according to human scale and scene scale).
Spherical Camera
A common use of this camera projection is to allow the creation of environment maps in Latlong formats. The same mapping could be achieved in the cylindrical camera with careful setting of the Horizontal FOV, Vertical FOV and Projective parameters but the spherical camera is provided for convenience.
This camera doesn't have much controls as compared to the other cameras . It doesn't give separate FOV controls and can only be used to create perfect Latlong images.
Again for rendering stereoscopic Latlong images we need to create same camera rig that we have created for cylindrical camera.
Attribute reference for Spherical Camera
Fish Eye Camera
Fish eye camera can also be used to render 360 images and videos. Refer below mentioned links for more information.
Attribute reference for Fish Eye Camera
Dual-fisheye Lens Stitching for 360-degree Imaging
Generating Panoramic Views by Stitching Multiple Fisheye Images
Perspective Camera
Using perspective camera for rendering 360 images or videos is most traditional way of this process.
It actually works like capturing images in real world. We need to create a rig of 6 cameras (Front, Back, Left, Right, Top, Bottom) and setting the focal length and FOV of all the cameras accordingly and then stitching captured images in any compositing software.
We can use this Python script which helps in creating camera rig and setting up all the camera attributes and resolution correctly
Attribute reference for Perspective Camera
Rendering 360 images with Perspective Camera (Maya Python Script)
Stitching Captured Images (Nuke Script)
This pipeline is a combination of 2 complimentary scripts, 1 Python script for Maya, and 1 TCL script for Nuke.
The Maya script creates 6 cameras with 90 degree angles of view in order to capture the entire scene in 6 images, while the Nuke script projects those 6 images onto the inside of a sphere to create a Latlong map.
The Maya script is run after selecting the normal camera you want to base your 360 rig off of. The script simply creates 6 grouped cameras in the same position (and constrained to) the original camera, pointing forward, left, back, right, up, and down. The user must then manually open attributes for each new camera, and set the film aspect ratio parameter to 1 rather than the default 1.5. This is not done through the script because the film aspect ratio and angle of view parameters are not normal settable attributes in Maya, instead they are calculated mathematically on other factors like focal length, and displayed to the user for their convenience. The resulting cameras after the change should have a 90 degree angle of view and a 12mm focal length.
At the end of the Maya script, the global render resolution is also set to a square, based on the height that was previously set. (IE, if the resolution was originally 1920x1080, running the script would set it to 1080x1080. This behaviour can be disabled by commenting out the last 2 lines of the script.
After batch rendering the 6 camera views from Maya, the images are brought into Nuke for stitching. The TCL Nuke script can be read into nuke with alt+X . This will create a setup with named dots indicating where to plug the images in. Each image is projected onto the appropriate portion of the inside of a sphere, and the 6 spheres combined to make a full 360 degree image. A spherical Nuke camera is placed in the middle, and sent to a scanline render node for the final Latlong map.
Script for rendering 360 images and videos from perspective camera is given by Dhruv Shankar
VR Camera
VR camera is generally used for rendering stereoscopic and Monoscopic 360 images in three different formats and it also offers a lot custom controls.
It features two cameras offset by a distance with a specific 360º projection. If we are using VR Camera we don't need to create custom camera rig like we are doing with cylindrical and spherical camera, it will automatically render two images one for left eye and one for right eye in specified projection and layout format.
It works with any scene component that can be rendered in an offline renderer: meshes, hair, particles, volumetric and complex shading networks.
VR camera offers three types of projection
1. Latlong
2. Cube Map 3*2
3. Cube Map 6*1
We have already discussed about projection techniques in previous section. But its better to understand technical workaround how Arnold's VR Camera calculate these projection.
Latlong
Imagine you are standing inside a SPHERE.
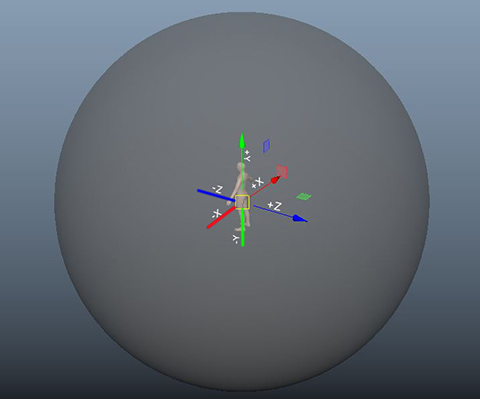
Now as we have discussed before, projection is just a technique of sphere Unwrap. Like this
So this is how VR Camera creates Latlong Projection
Cube Map (6x1)

Cube Map (3x2)
Cube maps provide better aspect ratio and less distortion in 360 images & videos but these formats are still not supported by most of streaming platforms. So we can only use these formats if we have know the platform accepts this format or not.
And also chances of getting seam in cube mapping is much more than Latlong because each edge of cube represents a seam. there are far more seams compared to the Latlong - 12 in all (if we are using Cube map 6x1 format for stereo images).
Seams can avoided by rendering images and video in Box Filter (1x1).
Using Cube map will need little post processing work because the format that oculus or any other viewer accept is different from the format in which Arnold render the final image.
We need to swap +z and -z axis in image using nuke script.
Layout Format
VR Camera offers 4 layout format.
1. Side by Side
2. Over Under
3. Left eye
4. Right Eye
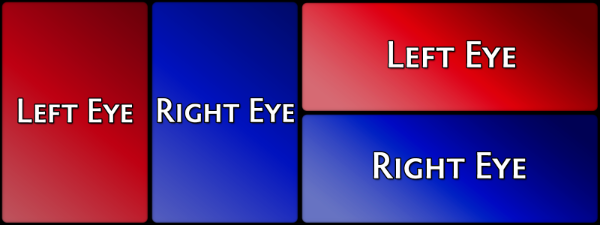
Side by Side and Over under format is used to render combined stereoscopic images. So we are choosing any one of the format, resolution and aspect ratio will also change. You can get idea about rendering resolution and aspect ratio in next section.
Layout format completely depends on platform we are going to upload our image or video. We will talk out about the platform specifications in details in later section.
Resolution and Aspect ratio for Rendering
Different projection technique has a different resolution and aspect ratio for rendering a image or a video.
Rendering wrong resolution or aspect ratio can create several artifacts like seam lines, distortion, blurry images playback error etc.
Platform Specifications
I've put together a little write-up on each of the platform leaders, to help you make your way through the virtual landscape and come out the other side with an experience to make even the most seasoned 360 expert.
We’re starting strong with a social media favourite. Ever since Facebook launched the option for 360 videos back in 2015, everyone’s been eager to jump on the virtual bandwagon. In 2016, Facebook had a staggering 1.86 billion monthly active users – that’s an awful lot of potential audience for your 360 content.
You’ll get the option to stream your 360 delights in up to 4K and Facebook is one of only two in our list to support live 360 films – a medium that’s getting increasingly more popular. But, with great benefits, comes great responsibility. Currently, you can only upload 360 videos which weigh in at less than 1.75GB and you’ll get capped at the 30-minute mark. So consider whether it’s tech specs or exposure that you’re after.
Facebook 360 Video and Photos Specs
YouTube
The fan-favourite video platform, YouTube, has been around for a fair few years, racking up billions of views. Now, it’s leading candidate in the race for best 360 platform. When it comes to users and engagement, YouTube will always win, hands down. With more than one billion users, if you’re looking to reach specifically video viewers, YouTube’s the best. And, it has an impressive upload limit – allowing brands to publish their 360 masterpieces that are up to 123GB in size. The only other competitor in our list to offer this, it also enables live 360 streaming in up to 4K res. The perfect platform for your live 360 gig.
But, in terms of VR headsets and overall usability, it only supports Google Cardboard and Daydream. This is only a setback if you see multi-platform exposure as part of your endgame. Where it falls down in VR headsets compatibility, YouTube more than makes up for it across its other 360 specs.
YouTube 360 Video Specs (Monoscopic) YouTube 360 Video Specs (Stereoscopic)
Vimeo
Third up is the second biggest video giant, Vimeo. While it might not have the audience stats to quite stack up against the billions who use YouTube, Vimeo’s stats stood at an impressive 715 million monthly views. Vimeo has its own terms for video upload limits, so that’s hard to compare but one thing it has got is the best resolution in the business. If you’re keen to invest in the future of video, its whopping 8K 360º videos will make sure your audience never miss a moment of the high definition action.
The frame rate for all uploads is up to 60 fps and this adds a little something extra to your content. Like YouTube, Vimeo has also opted to support Cardboard and Daydream headsets rather than Oculus. This is not necessarily Vimeo’s downfall, especially if you’re looking to reach mass audiences with a simple and cost-effective headset like Cardboard. But while you can watch content offline on Vimeo, there’s no sign of live streaming. If Vimeo moves into the live world, they could give the others a serious run for their money.
Here are the key pros and cons for each:
Facebook:
Pro: Most exposure for a 360 platform & live streaming / Con: Upload limit of 1.75GB per video
YouTube:
Pro: Biggest upload limit per video of 123GB & live streaming / Con: Not compatible with all VR headsets
Vimeo:
Pro: 8K resolution supported for videos / Con: No live streaming 360 option
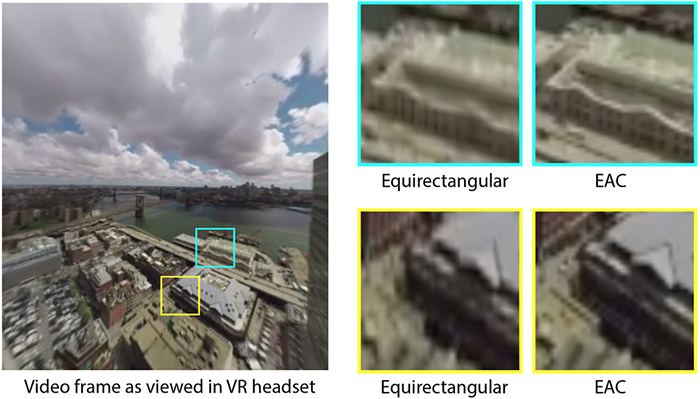
Future Improvements
Various industry experts are working on improving the quality of VR videos. The biggest drawback we see is distortion and the pixel distribution in Latlong format.
So experts has come out with better projection technique which is Equi-Angular Cubemap
Click on the below links to get detailed info about Equi-angular Cubemaps